
Your Cart is Empty



Last Updated: November 6, 2026
Quick Summary
The core metal detecting tools for recovering items from crevices are a crevice pick matched to crack width, a pinpointer to trace the signal to a single point, and a sucker, sniper or sniffer bottle for wet or sediment-filled cracks. Work locate, look, extract: confirm the signal, inspect the crack with a torch, then loosen and lift material onto a mat.
Most recovery guides assume the find is in open ground.
That is why metal detecting tools for recovering items from crevices differ from a general recovery kit: you need reach, not digging power, and precision, not volume.
A common pattern in the field: a detector signals a target, the operator digs wide, and the signal vanishes into loose dirt.
Crevice work flips the order: locate, look, extract. Below are the seven tool types that make that workflow possible.
Before any precision work, confirm your detector is set up correctly. Our guide to professional metal detector setup steps covers ground balance, sensitivity and discrimination, which matter far more in mineralised crevice country.
A crevice pick is a narrow, hardened steel tool used to scrape, rake and loosen material from cracks too tight for a trowel. The right pick matches three things: crack width, working depth and what the rock is made of.
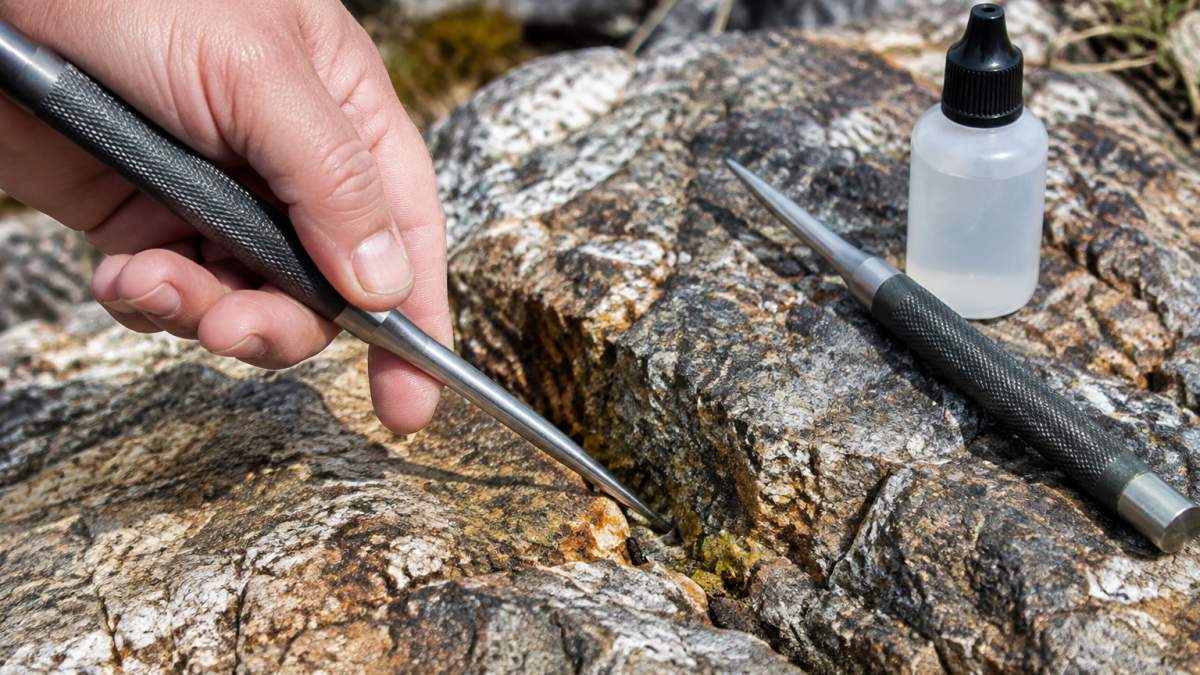
Think in three tiers:
Material matters just as much. The Tyger tools are made from Hardox 450 steel, which is quenched and tempered and has high abrasion resistance.
If you want a set that covers several crack sizes in one kit, the six-piece crevice pick and hook set is designed for getting into small crevices.

A pinpointer is a small handheld detector used to locate a target precisely once the main detector has narrowed the area.
Your detector says the target is somewhere in a one-metre patch of broken rock. Without a pinpointer, you scrape and hope.
Precision helps protect the find, since a pick swung at guesswork can damage delicate items.
Our pick for tight-space work is the XP ORX MI pinpointer with bonus items, which lets you confirm the target's exact position before any tool touches the rock.
A useful habit: sweep the pinpointer along the outside of the rock first.
Target recovery in crevices follows a fixed sequence. Skip a step and you either lose the signal or damage the find. The method below is the one we recommend to anyone moving from open-ground digging to precision work.
The step most people skip is number four. A quick look inside the crack tells you whether the target is loose or wedged, which changes the tool you reach for next.
Watch out: never lever a pick against a loose slab to widen a crack. Rock that shifts can trap fingers or drop the target deeper.
Dry cracks are the easy version. Wet crevices, submerged bedrock and sediment-packed cracks need a different approach, because the target is often mixed into heavy sand and gravel a pick cannot lift cleanly.
You cannot scrape wet sediment out of a narrow crack, it slumps back. You need to lift the material as a slurry and separate the target on the surface.
BJK 6pc Crevice Pick and Hook Set →
These three tools overlap but are not interchangeable. Match the tool to the water and sediment in front of you:
A simple rule: dry and fine, start with the sniffer bottle. Wet and narrow, use the bulb sniper. Wet, wide and full of gravel, use the quick sniper and plan to pan the contents.

The sequence matters more in water than on dry land, because every disturbance moves material:
Watch out: never pump a water-filled crack without checking what is downstream. Work over a mat or pan, not open water.
Sieving extracted material is a sensible step in wet work, so you can inspect the retained fraction for smaller targets. Keeping the sieve and brush beside the suction tools also makes it easier to spot gaps in your setup and apply the same practical approach to finding specialized tools for other tight spaces.
If the crack is too deep or narrow for any suction tool to reach the bottom, stop. Forcing a tube into a crack you cannot see into jams tools and pushes targets out of reach. Mark the spot and return with a longer nozzle.
Careless extraction ruins more finds than bad detection, and in crevice work the risks run three ways at once: the find, the tool, and the rock.
This part is easy to overlook, and it matters most in crevice country:
Crevice work puts your hands and face close to sharp rock and sharp tools, often while crouched or reaching into a space you cannot fully see.
A common mistake is treating a crevice like a digging site. The rock will not forgive force.
A crevice kit should fit in one bag and cover every situation you meet in a session. Here is the loadout we suggest:
| Tool | Job | Typical Price |
|---|---|---|
| Crevice pick or hook set | Loosening and raking material | $30 |
| Micro pick | Hairline cracks | $29 |
| Long claw | Deep, wide crevices | $60 |
| Pinpointer | Locating the target precisely | Varies by model |
| Sniffer bottle or sucker | Pulling material from wet cracks | $9.95 to $119 |
| Hand digger or coin popper | Shallow surface targets | $40 to $45 |
| Finds pouch | Keeping recovered items safe | Varies |
| Small sieve and brush | Checking extracted material | Low cost |
Field-readiness comes down to three habits: dry and check your steel after every trip, keep a small sharpening stone in the bag, and restock consumables like lanyards and paracord before they fail.
The Lost Treasures finds pouch rounds out a compact kit by keeping recovered items separate and secure while you keep working.

Every tool in this guide solves one problem: getting a target out of a space never designed for a shovel.
If you are not sure which combination suits your ground, our team can talk you through it. We offer a range of detectors and fossicking equipment, detector hire, and training for all skill levels.
Get started with Lost Treasures and build a crevice kit that turns every faint signal into a recovered find.
It depends on the crack. A thin crevice pick or hook set handles narrow surface cracks, while a longer claw tool reaches deeper vertical gaps. For wet or gravel-filled crevices, a sucker or sniper tube lifts material out instead of scraping it. Add a pinpointer to confirm the target's exact position and a sniffer bottle for tiny finds. Crack width and depth can vary within a single site, so carrying more than one crevice tool is often useful.
Yes, and it is often the fastest way to avoid unnecessary digging. Once your detector signals over a crack, run the pinpointer along the opening to work out which section holds the target and how far in it sits. Confirming the target's position first can help you avoid scraping unnecessary rock and disturbing ground.
Loosen the surrounding material rather than levering at the find itself. Use a pick or claw to break up compacted gravel beside the target, then lift it free with your fingers or a scoop. Tools with no sharp edges, such as the Tyger range, have no sharp edges according to their listings. If the target will not budge, keep working the material around it instead of applying force, and take extra care with corroded or thin items that bend easily.
A moving signal usually means the target has shifted, or you are now picking up a second item nearby. Stop digging and re-scan the hole with your pinpointer to find the new position. Small targets often slide down as you loosen material, so check the base of the crevice and any loose gravel you have removed. If the signal disappears entirely, scan the spoil pile, because the find may already be out of the crack.
Crevice work rewards preparation over force. If you want gear matched to the rock you actually detect, talk to our team and we will help you choose the right picks, pinpointers and extraction tools for your next session.
Comments will be approved before showing up.


